Wednesday, December 30, 2009

Craft Ideas: Hand Craft your own Christmas Ornament Balls

Here's one craft idea for you. Hand craft your own Christmas ornament balls. It is really simple to put together. All you need is one of those clear plastic balls that you can just snap the 2 halves together. It has a loop at the top that you can string ribbon through it for hanging. And you can usually find these clear plastic balls in craft store or online store. They come in different sizes, usually range from 3cm to 14cm in diameter.

Next, you get some filling for inside the ball. Here, I have a clear plastic ball, a Christmas pick, a bird (any kind of bird that you like) and a bit of pillow stuffing. Before you start, it is important to clean your plastic ball to remove and dust or dirt inside the halves. Next, you cut the stem from the Christmas pick so that it has a flat bottom. Then you sit your bird on the pick, you can hot glue it to the pick, or wired it down. Some birds come with wireds at their feet that allow you to do that. Put the stuffing at the bottom of the pick, and gently put the whole thing inside the 2 halves of the plastic ball. I like using the pillow stuff material in my designs, it gives the ornament a snowy effect. Make sure you situate your decoration to your liking before you snap the 2 halves together. And finally clean the outside of the plastic ball before you hang it on your Christmas tree.

So there you have it. A hang crafted Christmas ornament ball. Not only you can personalize your ornaments, they also make a great Christmas gift! They are simple and cheap to make. Unique and beautiful Christmas Ornament balls!


Craft Idea: Customize Hand Craft your own Cinnamon Sticks Christmas Ornaments


Need some ideas for crafting? Why not try hand craft your own cinnamon sticks Christmas Ornaments for your Christmas tree this Christmas season if you love crafting. Here's one craft idea for you that you can easily make it yourself. Cinnamon sticks Christmas ornaments!

It is really simple to make and a lot of fun to make it. All you need is some cinnamon sticks, assorted ribbons to tie 3-5 cinnamon sticks together. Give the ribbon enough length that you can hang the ornament on your Christmas tree. To make it colorful and attractive ornament, have something in the center of the cinnamon sticks as focal point. There are a lot of different stuff that you can use as focal point. The easiest way is to get some Christmas picks from any craft store and glue it on to the sticks. Of course you can always make your own decorations as I have done on my cinnamon sticks as shown in these pictures. I love using berries picks and just divide them among different ornaments.

Not only do these hand crafted ornaments give meaning to your Christmas tree, they also add a hint scent of cinnamon to your tree. They also make a great Christmas gift to those who love hand crafted stuff.


Saturday, December 5, 2009

Christmas Front Door Wreath

Having a front door wreath really adds characteristic to your front door. Front door wreath is the first thing you see that welcoming you home. It is also the first thing your visitors will see when they are visiting you. With Christmas just around the corner, it is nice to have a Christmas front door wreath to add that season greeting feels to it.

This 18" Christmas front door wreath is a custom design made by myself. Since I'm having trouble finding the wreath I that like from anywhere, I decided to put a Christmas wreath together myself. I add couple of red poinsettias, white roses, all kinds of berries, couple of pine cones, and cinnamon sticks to give it cinnamon scent on the wreath when you come through the front door. I add a white transparent material bow on the upper corner of the wreath to balance this Christmas front door wreath that I've created.

If you can't find a wreath that you're looking for, or affordable price for the wreath, try making one yourself. It is always cheaper to buy your own materials, and there are usually good deals on Christmas stuff from craft stores at this time of the year. By making your own wreath, you'll know exactly what you want. So have fun and try to make it yourself!

Saturday, November 28, 2009

Craft Idea: Turn Candle Holder into Flower Arrangement.

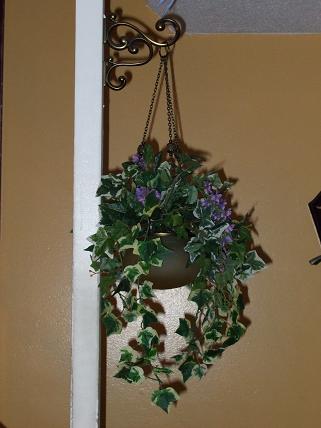
Here's a craft idea, while not using the hanging candle holder, why not turn it into an attractive flower arrangement. This is an elegant hanging candle holder that I bought from the Party Lite catalog. Beautiful good size hanging candle holder. One day I got tired of looking at the candle holder just hanging by the stair way while there's no candle burning in it. So I dig through my left over craft supplies, and found some stuff that I can turn this hanging candle holder into a hanging flower arrangement instead. With ivies hanging down to give it length, and a touch of purple flowers really turn this hanging candle holder into an attractive hanging flower arrangement.

Monday, November 2, 2009

Craft idea: From Dollar Store silk flowers to beautiful bouquet.

Would you believe me if I tell you the bouquet above is 90% made from Dollar Store silk flowers? Believe it or not, it's true. This is one of 3 bride's maid bouquets that I made for a friend's daughter wedding in November 2009. It's a Fall wedding theme. The bride loves the Fall leaves colors, but she doesn't like sunflower. So she provide me other types of flowers such as gladiolus and orchids, that she likes from Dollar Store.

Some people don't think that Dollar Store silk flowers are good enough for occasions such as wedding. Some would think that they are low quality just because the flowers are cheap. I disagree completely. With a creative mind, you can turn any cheap flowers into beautiful arrangements or bouquets.

Dollar Stores actually have a pretty nice selections on silk flowers now a days. It will definitely save you a lot money then buying wedding arrangements from floral shops. It's true that with professional, you are worry free of your wedding flowers arrangements but will definitely going to cost you. If you love doing crafts or someone you know that loves doing crafts, buy the cheap materials and make the arrangements yourself or have that craft loving someone do it for you.

This is exactly what happen here. They supply me with the materials, which are 90% from the Dollar Store. And since I love doing crafts, they've asked me to make the bridal bouquets for them. Material wise speaking, this bouquet costs less then $10 to make, where as from a floral shop, they can easily charge you over $100 especially if it is a fresh flower bouquet. (By the way, what you pay the most from floral shop arrangements is the labor cost. Some of the flowers can be cheap, but it is the labor cost for professional florist to make the arrangement that cost you a good chunk of money.) I made these bouquets for them with no charge, my excuse is.. it's my wedding gift to the family. For more of arrangements I've made for this wedding, please visit my Wedding Flower Arrangements- Home Made for more arrangements craft ideas.

Wednesday, October 14, 2009

Sunflower arrangement for your Fall decoration.


Fall season offers such a beautiful colours. Here's one of my bouquet idea for your Fall season display. You can have it as flower arrangement to brighten your home, or use it for Thanksgiving dinner table centerpiece, or for your Holloween display. You can use fresh flowers or silk flowers to make this. Here's what you need to put it together.

I found this bundle of sunflowers in a craft store. But as I mention before, you can use fresh sunflowers for this, altho they won't last more then 2 weeks.
* You'll need about 6-12 silk sunflowers, with each flower no more then 6" wide. If you're using fresh flowers, do note that it'll look nicer if you have at least 6 flowers. But it'll make a much bigger arrangement due to the size of fresh sunflower.
* You'll need to get some filler flowers. I use Limonium for the filler. You can easily buy a bundle of limonium from floral stores in the filler section. Not only does limonium makes a great filler for fresh flowers, it keeps really well as dried flowers as well. I use the dried limonium for all kinds of flowers arrangements I made. So you need about 2-4 branches of limonium.
* Next, you'll need about 6-12 wheat. You can buy bundle of wheat (as shown in picture) from a craft store or floral store.
* Lastly, also an optional, get some ribbons or tulle (lacey material). The tulle that I use is about a foot wide, and they are commonly use for wedding arrangements.

You'll need some sort of vase for the arrangement to sit in of course.

- So cut the flowers to desire length and put them in the vase. I do recommend a pyramid shape for the flower pattern. As in having a center flower at the highest length, and next layer of flowers will slightly be shorter in length then the middle one. Having 3 layers would be nice. You basically want a pyramid effect or a round shape in your main flower display.

- Next you cut the limonium to desire length to fill in the gap between the flowers.

- Then you cut the wheat to desire length and fill them in around the flowers. You want the wheat to stick out a bit, but not overly too much.
- And lastly, you tie your ribbon or tulle around the vase and the result is what you see.
It's really simple and easy to put together this arrangement and it makes a gorgeous display for your home. Of course, this arrangement can easily be turn into a wedding bouquet as well. So have fun putting this sunflower arrangement together and enjoy it!

Thursday, October 8, 2009

Craft your own table centerpiece for Thanksgiving.


Fall has arrived, with cooler temperature and leaves are turning colors all around you. With Thanksgiving just around the corner (Canadian Thanksgiving anyways), any thoughts on your table centerpiece for your Thanksgiving dinner? Here are couple of my ideas for table centerpieces for your Thanksgiving dinner table setting. Here's how I put together the above centerpiece together.

1. I have a set of floating candle stand at home. It's about a foot tall. You can use any type of candle stands for this, just as long as it's tall enough in the center to give it height.
2. Next you find a flat plate, any plate will do just as long as it's at least 10" wide and it's flat. You place the candle stand in the middle.
3. Fill the edge of the plate with fall leaves. You can use fresh leaves, but I suggest you clean them well first and dry them with paper towel. Or you can find any fall colour leaves in any craft store at this time of year.
4. You fill all sort of fresh fruits, or artificial fruits around the base of the plate. I use couple of oranges, apples, some grapes, and bananas.
5. Then you fill the holes in between the fruits with either fresh Fall colour flowers (sunflowers for example) or artificial flowers. In the case above, I used a combination of silk flowers and dried flowers.
And the result is what you see above. It's real simple and easy to make, it is bright and beautiful, and your guests will love it too if you use fresh fruits. Makes a good fruit desert centerpiece.


This table centerpiece is actually a glass shaped gord candle holder surrounded by Fall leaves and flowers. I actually found this candle holder in a grocery store from it's seasonal items zone. It came with gord shape like this one, and a pumpkin shape candle holder. I bought a foam ring from craft store that design to use it as wreath making. But in this case, I designed it as a ring of Fall flowers for the candle holder to sit in the middle. It makes yet another good table centerpiece for your Thanksgiving dinner party, or event for a Halloween event display.